This tutorial describes how you can record an Internet broadcast. By Internet broadcasts, we mean any sound played by a computer using a program such as RealPlayer, Windows Media Player, iTunes, etc. that originates from the Internet. This is also called streaming audio or Internet radio. Everything in this tutorial also applies when playing a local file (conversion by re-recording).
- Total Recorder's virtual driver
- A soundboard's loop-back line
- An analog loop back
- Recording with two computers
Method 1 - Using Total Recorder's virtual driver.
This is the preferred method. It is the most accurate method because the sound is captured exactly the way it is received by the soundboard driver. To use this method, Total Recorder's driver must be installed and enabled. If Total Recorder's driver is set to be active only when Total Recorder is active then you must start Total Recorder before playing the broadcast you want to record.
To record Internet transmission using this method, take the following steps:
- Start Total Recorder.
- Press the Recording Source and Parameters button:
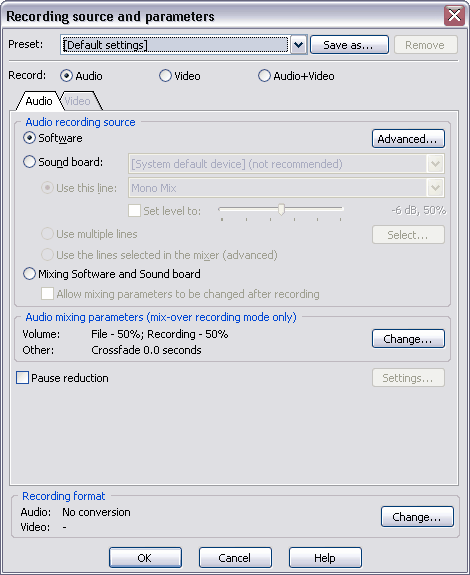
- Select Software.
-
If you would like to keep the captured sound “as is”, clear the Convert using "Recording format" specified below checkbox, press OK and go to the step 7. The sound will be saved as an uncompressed wave file with the original parameters (i.e. the format of sound being sent to the soundboard). This is recommended if you would like to edit the captured sound or convert it in more than one way (for example, put it onto an audio CD or into a portable music player such as iPod). It is not usually practical to store such files for a long time since they will take up a lot of disk space.
-
If you would like to convert (compress) the sound “on the fly”, select the Convert using "Recording format" specified below check box. In the Recording format section, click the Change button:
-
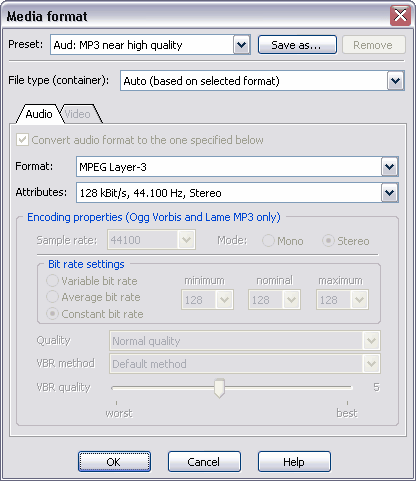
Select the format and attributes you want and press OK. Refer to the Selecting an Optimal Recording Format Tutorial for more information. For example, for an audio CD, select the PCM format and attributes of 44.1KHz 16 bit Stereo.
-
Press OK to return to the main window.
-
Click the Record button. The advantage of the virtual driver method is that Total Recorder will not actually record unless there is sound played.
-
Start the program to play the broadcast. As soon as it starts playing, Total Recorder starts capturing the sound. You should see the levels changing.
-
When you want to stop recording, press Stop. From the File menu, select Save As, and specify the file name and the folder you want to use to store the file.
Method 2 - Using the soundboard's loop back line.
To use this method, your sound card must have a loop-back line. Such a line allows you to record whatever is being played by a sound card. Nowadays, most sound cards have a loop-back line. A typical name for this line is “Stereo Mix”. Other names are “What you hear”, “Wave out”, “Loop back”, and possibly others.
- Start Total Recorder.
- Press the Recording Source and Parameters button:
-
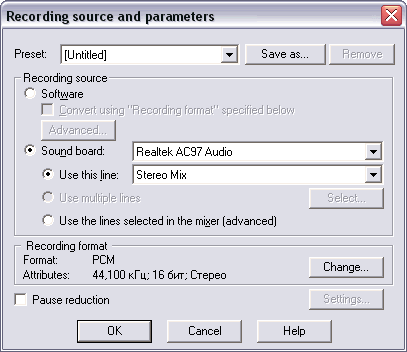
Select Sound board. Choose the desired sound card from the list (do not choose Record through Total Recorder)
-
Select Use this line. Choose the loop-back line from the list (see above for the possible names).
-
Click the Change button:
-
Select the format and attributes you want and press OK. Refer to the Selecting an Optimal Recording Format Tutorial for more information. For example, for an audio CD, select the PCM format and attributes of 44.1KHz 16 bit Stereo.
-
Press OK to return to the main window.
-
Start the program to play the broadcast and click the Record button in Total Recorder. Total Recorder starts capturing sound. You should see the levels changing.
-
When you want to stop recording, press Stop. From the File menu, select Save As, and specify the file name and the folder you want to use to store the file.
With this method, you connect the output and input lines of the sound card using a patch cord. It will work with all full-duplex sound cards, which can play and record simultaneously. Most modern sound cards are full duplex.
Method 4 - Recording using two computers
With this method, you use an audio cable to connect the output line of one computer and the input line of another computer. This method is the most universal and should always work.
Notes for Methods 3 and 4:
When using either method 3 or 4, a computer becomes an “external device” connected to a sound card. Refer to the Recording from an External Device Tutorial for the necessary cables as well as the recommended Total Recorder settings. The quality is generally worse than what you would get using the first two methods. The quality can vary considerably depending on the sound cards and cables involved. These methods should only be used if it is not possible to use either method 1 or 2.
You can also use Total Recorder's scheduler to automatically record an Internet transmission similar to how you program a VCR. For more information, see Using the Scheduler Tutorial.